Appliance Configuration
Configuring the Appliance AS AN INTRAVUE AGENT
Configuration of an IntraVUE Agent will enable an IntraVUE Server to access non-routable networks.
| STEP 1: Connect the Appliance as an Agent | Connect Ethernet ports prior to power up. Port 1 should connect to the accessible Plant Network (i.e. uplink). Port 2 (downlink) should connect to the non-routable network. |
| STEP 2: Discover the Appliance and Configure Ports | Use the tool discoverytool.jar to discover the Appliance on the network. Port 1 (uplink) is intended for the factory network and should be re-configured with a static address (default is dhcp). Port 2 (downlink) is set for a static IP address (default 192.168.255.127) and is intended to connect to the non-routable network to be scanned. |
| STEP 3: Access the IntraVUE Server | Access IntraVUE via browser interface to the production server. This will look like http://nnn.nnn.nnn.nnn:8765. Log in as admin. |
| STEP 4: Configure the IntraVUE server to scan the agent network | In the system menu open the “System Configuration” dialogue. Under the “Scanner” tab, select “Add” for a new network. Uncheck “Use Local Computer”, and then Check “Use Agent”. Add the agent external (Port 1 uplink) IP address and increment Net Group by 1. Add applicable scan range for the non-routable (Port 2 downlink) network. Follow the guide in the help menu for effective scanner configuration |
Configuring the Appliance AS AN INTRAVUE SERVER
Configuration as an IntraVUE Server will enable complete functionality as a stand-alone instance of the IntraVUE System.
| STEP 1: Connect the Appliance as a Server | Connect Ethernet Port 2 (downlink) to the local manufacturing network to be scanned prior to power up. For configuration as a server, only a single port is necessary, however to access the system remotely Port 1 should be connected to the WAN. |
| STEP 2: Discover Appliance and Configure Ports | Use the tool discoverytool.jar to discover the Appliance on the network. Port 1 (uplink) is set for DHCP by default. Port 2 (downlink) is set for a static IP address (default 192.168.255.127). |
| STEP 3: Access the IntraVUE Server | Access IntraVUE via browser interface to the Appliance IP address. This will look like http://nnn.nnn.nnn.nnn:8765. Log in as admin. |
| STEP 4: Register the Server License | Purchase appropriately sized license through an authorized Distributor. Under the system menu, access the “Product Registration” dialogue and follow the instructions to register the product key that was purchased. |
| STEP 5: Configure IntraVUE to scan the local network | In the system menu open the “System Configuration” dialogue. Follow the guide in the help menu for effective scanner configuration. |
 Do not assign IP addresses used by other devices in the scan range to either IP 1 or IP 2 when statically setting either of these. If your network is made up of static IP addresses this can cause IntraVUE to show lots of "change mac" messages and duplicate IP issues in your Analytics report. This could create potential lockups for some devices when they comeback online and do a duplicate IP check.
 Antivirus software, firewalls or firewall rules, and windows group policies can prevent the discovery tool from finding an IntraVUE appliance (either placed as server or agent) even when connecting a laptop directly to the appliance. Make sure to disable these and try again using the discovery tool.
For Complete Configuration Instructions, refer to the Appliance Quick Start
IntraVUE Appliance Discovery Tool
The configuration utility for the appliance is named the discover tool. This utility is available on the disk included with the Appliance or downloadable here
The discoverytool utility uses broadcast traffic from the computer running the tool to communicate with and discover the appliance. Using broadcast traffic requires the computer and the appliance be in the same network/vlan. If VLANs are used and there are any switches between the appliance and the computer with the discovery tool, the ports carrying the traffic by all the switches involved must be in the same VLAN as the appliance and tool host.
Accessing the appliance in networks having DHCP
The configuration utility for the appliance is named discoverytool.jar. This utility is available on the disk included with the Appliance or as a downloadable file from the following location. This link will start the download of the tool: http://www.i-vue.com/plug/discoverytool.jar.
The discoverytool.jar utility uses broadcast traffic from the computer running the tool to communicate with and discover the appliance. If VLANs are used and there are any switches between the appliance and the computer with the discovery tool, the ports used by all the switches involved must be in the same VLAN as the appliance and tool host.
The quickest and simplest method for connecting to and configuring the appliance uses DHCP to temporarily connect to and reconfigure the appliance
• The host running the discovery tool must be in the same subnet as the appliance.
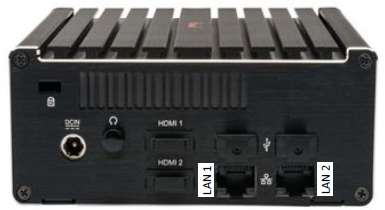
• Connect Port LAN 1, the left port, to the network.
• The computer should NOT have any additional addresses in the same subnet as is being used, for example a wireless IP. If it does have a second address in the same subnet, disable that NIC during configuration.
• The appliance should also NOT have a second IP in the same subnet, even if the other port is not connected. This is the factory default condition.
• Launch the Discovery Tool in File Explorer by double clicking on discoverytool.jar or by right clicking on the file and selecting Open. Note: Java is required on the computer running the discovery tool and must be in the path environmental variable.
If you launch the tool and nothing happens you probably do not have Java installed on the host computer. Check this in your Control Panel. If Java is not installed, go to http://java.com and download a 32-bit version of Java.
If you launch the tool and you see the column headings but no device is discovered, we recommend you follow the rules for connecting without DHCP (next section).
If DHCP is not available in the location where the appliance will be finally located, you can move the appliance into an office or other network which does have DHCP for purpose of configuration, and then move the appliance to its permanent location after configuration.
Alternatively, the appliance can be configured by configuring a computer to connect to the appliance using a fixed IP address:
• Configure the computer to have an IP address. The factory default fixed IP of the appliance Port 2 is 192.168.255.127, so an address of 192.168.255.10 would work as an example.
• Connect Port LAN 2 to the network or directly to the computer with the discovery tool.
• The computer should NOT have any additional addresses in the same subnet as is being used, for example a wireless IP. If it does have a second address in the same subnet, disable that NIC during configuration.
• The appliance should also NOT have a second IP in the same subnet, even if the other port is not connected. This is the factory default condition.
• Launch the discovery tool.
• Configure the appliance (below)
Using the Discovery Tool Utility to Configure the Appliance
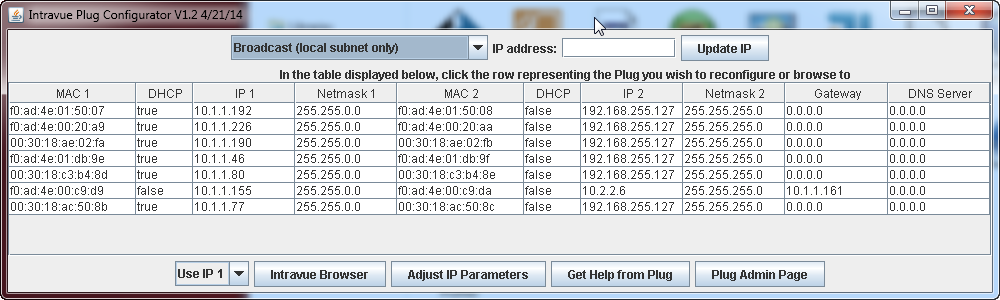
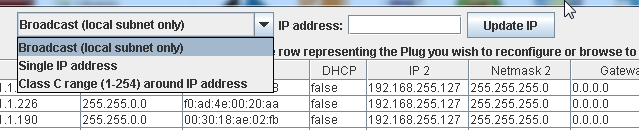
The tool will Discover Appliances found on the network using three choices for discovery method:
•[DEFAULT] Broadcast only works when the appliance and the computer running discoverytool.jar are both in the same subnet. The IP address field is ignored in this mode.
•Single IP address will use the IP in the IP address field.
•Class C range will scan a whole class C. To configure a device, found by this method, you must switch to the Single IP method once you find the IP of interest.
Selecting one of the lines in the Appliance Discovery Tool with a left mouse click and then selecting the Adjust IP Parameters button will open the Update IntraVUE Appliance IP Settings display. The correct “Use IP 1” or “Use IP 2” must be set at the bottom of the discovery tool.
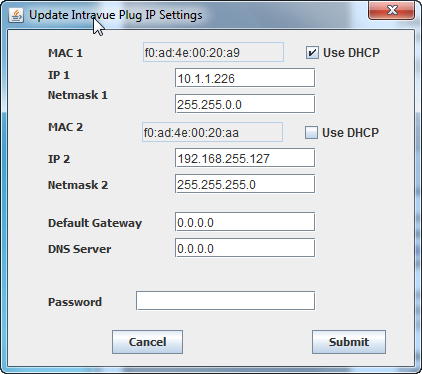
In this dialog the IP addresses (uplink and downlink), Subnet Mask, and DHCP settings can be adjusted for both ports.
In addition, a global Default gateway and DNS server IP address can also be configured if required. In many applications where there are isolated networks these would be left all zeros.
To save the settings enter the password [default: ‘intravue’ (case sensitive)] and select Submit.
To continue with configuration, you must first determine whether you are configuring your Appliance as an IntraVUE Server or as an IntraVUE Agent. What’s the difference?
An IntraVUE Agent is used only to help scan networks that are otherwise inaccessible to the broader plant Ethernet network. This is common for networks that are stand-alone and not connected in any way to the Plant Ethernet Network, as well as for networks that may be only accessible through a proprietary gateway such as a PLC. For this use case, the Appliance does not require any license to operate and instead will be configured to operate as a slave to a separate licensed IntraVUE Server, typically in the control or server room.
An IntraVUE Server includes the complete functionality of IntraVUE to scan Ethernet networks and provide visibility and access to analytics capabilities inherent within IntraVUE. An IntraVUE server exists independently from other IntraVUE servers and can be hosted on the IntraVUE appliance, though other common scenarios include hosting on a standard Windows Server or Virtual Machine environment.
Updating the IntraVUE Appliance
To update your IntraVUE Appliance to the latest version (2.4.1 as of this writing) follow these steps:
Before updating your appliance make save a backup of the current database. See Generate Support Archive
- Download the update packager from Downloads and follow the instructions from
- Extract all files
- Go to the ..\applianceonly_2.4.1a9 folder and locate your appliance using the agentconfig_all.jar (Agent Discovery Tool). See Instructions above.
- Open plugupd_all.jar and point the target IP to be that of the IntraVUE appliance.
- Select 'Appliance' and 'Use tgz File' options and leave 'Preserve user data' checked.
- Click 'Start Upload'
- Wait for 'Finished' message
- Click 'Intravue Browser'